
FOAMINATOR
TIME DELAYED COIL CLEANING ACTION
Purge Line-set and System Flush is the industry’s all in one solution for cleaning up HVACR systems after burnouts, before refrigerant conversions, and new system / component installations. Purge has been designed to be a powerful but safe solvent cocktail that removes sludge, carbon residues, oils, acids, moisture particulates and more from condensers, evaporators, and line-sets with no long-term environmental or health risks.
FEATURES & BENEFITS
- 140+ PSI vs 40-50 PSI from other brands
- Industries Highest Pressure Aerosols/Cylinders requires less flush to clean more
- Non-toxic / Non-flammable / Non-ozone depleting
- Used the same way as R-11 refrigerant
- Low boiling point
- Leaves no residue
- Used for new system cleaning, retrofits, and flushing line sets and after system burnouts
- Removes impurities (sludge, oil, acid, moisture, etc)
- Proprietary chemical blend traps and removes more moisture & acid than other brands
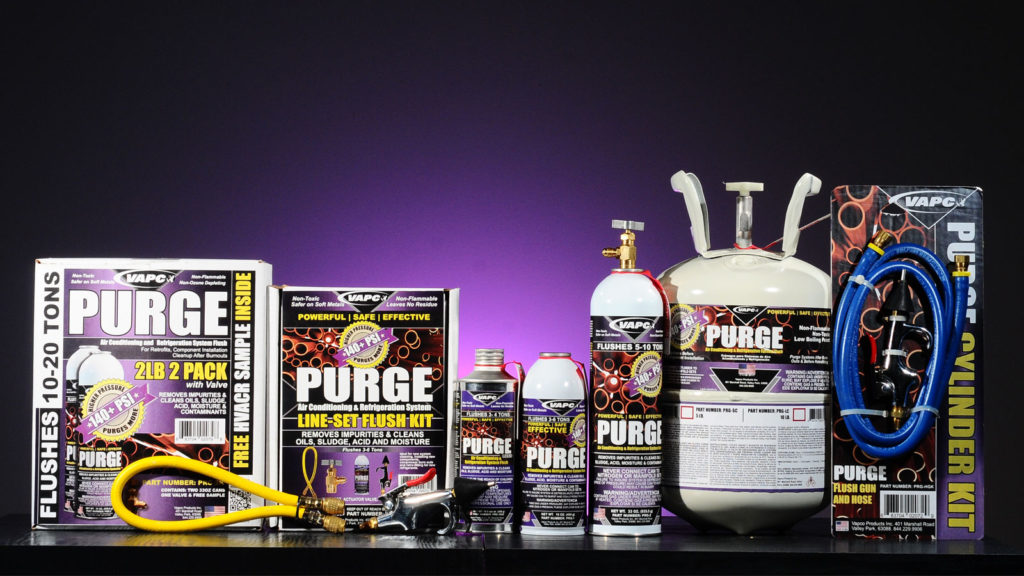
PART NUMBERS & SIZES
- PRG-1 1lb Aerosol – 3-6 tons
- PRG-2 2lb Aerosol – 5-10 tons
- PRG-SC 5lb Cylinder – 20-30 tons
- PRG-LC 10lb Cylinder – 30-60 tons
- PRG-1K Purge Starter Kit (Flush Gun, Valve, Flush Hose, PRG-1)
- PRG- 2K 2 PRG-2, with actuator valve
ACCESSORY PART NUMBERS
- PRG-H18 Purge Flush (18″) Hose
- PRG-ACT Purge Actuating Valve
- SPR-PRG Purge Line Set Flush Gun
- PRG-HGK Purge Hose (5‘) and Gun
MAXIMUM PRESSURE FOR MAXIMUM CLEANING

Purge has been formulated to contain the industry’s highest pressure, more that 3 times of the closest competitor. Higher pressure allows the contractor to use less Purge when compared to other brands. Vapco’s proprietary formula also contains special acid and moisture absorbing abilities to ensure the trapping and removal of more system harming contaminants. Purging systems when necessary should be an integral standard for any major system repair, retrofit, or change-out and can cut down and avoid the need for time consuming repairs and repeat visits. Pair with one of Vapco’s Performance Xpress Injects for even better long term protection and system improvement.WARNING:
*NOTE: Never flush through a TXV, orifice plate, filter drier, or capillary tubes as particulates may clog these components.

APPLICATION
Occasionally during the life of HVACR systems they experience contaminant formation that leads to component failure and compressor burnout. Large quantities of sludge, acids, carbon based residue, particulates and moisture are all culprits of component failure and Purge is the best way to remove these from systems so the system can be returned to ideal working order. Flushing may also be necessary when installing new components or when retrofitting systems for new refrigerants. In every case when using Purge, various levels of flushing may be required, from flushing line-sets to purging the entire system.*
- For tubing up to 7/8” use a 30-50 second burst of Purge through each 50 feet of line-set for aerosol cans. Use a 15-25 second burst for 5 and 10 pound cylinders.
- For tubing up to 1/2’ use a 10-20 second burst of Purge through each 50 feet of line-set for aerosol cans. Use a 5-10 second burst for 5 and 10 pound cylinders.
GENERAL GUIDELINES
1. Only use the correct refrigerant, recovery equipment, components and parts, tools, and lubricants that are established in the industry and listed in this service bulletin.
2.Inject the solvent in the supporting refrigeration system, it is the only part that should be flushed. Do not inject the solvent directly into the compressor.
3. Disassemble large systems or systems with unusual configurations and flush section by section to insure no solvent is trapped.
4. Depending on the nature of the internal design of the system, the degree of contamination trapped in the system, the nature of the system failure, and the temperature at which the failure occurred at, the amount of flush will vary.
5. A visual inspection is recommended if the system to be flushed includes larger components such as a receiver. If components are small enough to be flushed using product and appear to be contaminated, then proceed. If parts are too large to be reasonably flushed with product, then consider using a degreasing solvent such as Degreaser (Part. No. DS-1.)
6. DANGER: The canister should NEVER be connected to nitrogen vis manifold sets or other charging hoses! The can may burst and result in injury if the system is not free of pressure when injecting product.
TO FLUSH SYSTEM AFTER BURNOUT
- Before beginning confirm you have all of the required components for the service and the flushing operation.
- The existing refrigerant and lubricant should be removed using the appropriate methods and recovery method if the system is still operational.
- The configuration of the system should be reviewed. For larger systems, sections of the system should be disassembled so that individual sections can be cleaned section by section.
- All electrical leads should be de-energized and safely positioned. The following components need to be removed: a.) Disconnect the old compressor, then remove it from the system b.) Filter driers should be removed. If it is simpler, install a by-pass loop around the filter accumulators,etc. c.) Remove check valves and four-way reversing valves on the heat pumps. Configure and install by-pass loop id desired.
- To capture the contaminated flushing solvent connect a waste container to a discharge port. The Solvent will contain oils, condensed water, acids, particulates and possibly other mechanical residues as it exits the system. These residues need to be captured for proper disposal.
- To increase the mass flow and contact time of flush through the lines, crimp or restrict the discharge port. Your charging hose should be connected onto the system to be flushed. All openings upstream should be closed, except the discharge port. Connect the Injection Valve to the canister. Connect the canister to the charging hose and open valve when you are ready to inject the flush.
- The time to adequately flush the system can vary depending on the system size, ambient temperature, and oil load. To ensure the system has been properly flushed, be sure the solvent flowing out of the exit point is clear and free of contaminates. Continue flushing if dirt remains until the flow is clear. If the entire canister is not used, it can be used at a later date. NOTE: The canister will only empty itself completely if standing upright due to its design, do not attempt to flush a system with an inverted or angled can.
- The compressed nitrogen should be injected into the system right after the flush. Connect the nitrogen tank to the system and inject it into the where the flush was administered. A pressure of 120 psi should be achieved with the nitrogen. The nitrogen will help to push the product through the entire system, agitating the mixture so that it “scrubs” the inside of the system. All of the solvent will eventually flow into the waste container at the drain port. DANGER: Make sure the flush is not connected to the nitrogen purge.
- When observing the solvent captured by the receiving container, make sure it is running clear. If it is clear the system has been successfully flushed. If it is murky or contains particulates the system needs to be flushed again.
- Make your repairs and remove any by-pass loops you installed. Tie in the expansion devices then replace the filters/driers. Make sure the system is secured.
- Then evacuate the system to a low micron pressure range with the vacuum pump and leak check the system. Doing this will ensure that any residual solvent is evacuated and removed from the system. The time for the pulling vacuum should be around 15 minutes for a five ton system.
- Your final step is to recharge the system with refrigerant and lubricants as recommended by the manufacturer and system instructions. All electrical components should be reconnected before testing the system. After testing the system , wipe it don and leave the work area neat and clean.